Much of the talk before this England Australia game was around the midfield, England opting for a starting 10-12-13 of Farrell, Tuilagi and Slade. Australia opting for Lealiifano, Kerevi and Petaia.
Part of Englands decision was to nullify Kerevi (and Petaia) but there was never much in the way of deception around how England would in turn play, it was about going forward both in attack and defence, brute forcing the Australians.
Of the four tries England scored, two were created by powerful direct play on the ball. One, Mays second try from the Slade intercept, came from a fantastically controlled powerful defensive set by England (I broke that try down here).
In this article I want to look at Jonny Mays first try and how England built the momentum behind it.
The Anatomy of a Try.
The launch point for this try is a lineout at 16:38. Australia are leading 3-0 and have managed to repel England’s attack, turning the ball over when Billy Vunipola picks and goes in isolation and as a result they clear their lines.
It had been an interesting attack previously with Billy Vunipola making a mistake and Slade passing up a 4vs3 to go himself when perhaps keeping the ball and attack alive might have been the better option.
So heading into this launchplay England needed to make this pressure finally count and they call a pre-planned strike move (confirmed by England Skills Coach Scott Wisemantal) born from opposition analysis.
England, go off the top at the line out. We can see England have Tuilagi and Billy Vunipola set up as carry options and Farrell as the slide around option.
The gain line is marked to illustrate how close/over the line they get. With two ball carrying options and a distributor in behind Australia have to mark all of three, and we can see Lealiifano takes the outside runner Vunipola, giving Tuilagi a one on one with Hooper who he drags with him post contact.
It’s a dominant carry and Importantly it has completely fractured the Australian defence. It takes a number of Australians to stop him, creating an imbalance somewhere in the Australian defensive line and splitting the defensive line in two.
It’s a 3 second ruck from when Tuilagi is finally hauled to ground until Young’s clears and because of this Australia have barely set a ruck guard. Wider we can see that only one Australian defender, Pocock, manages to fold around to help create numbers.
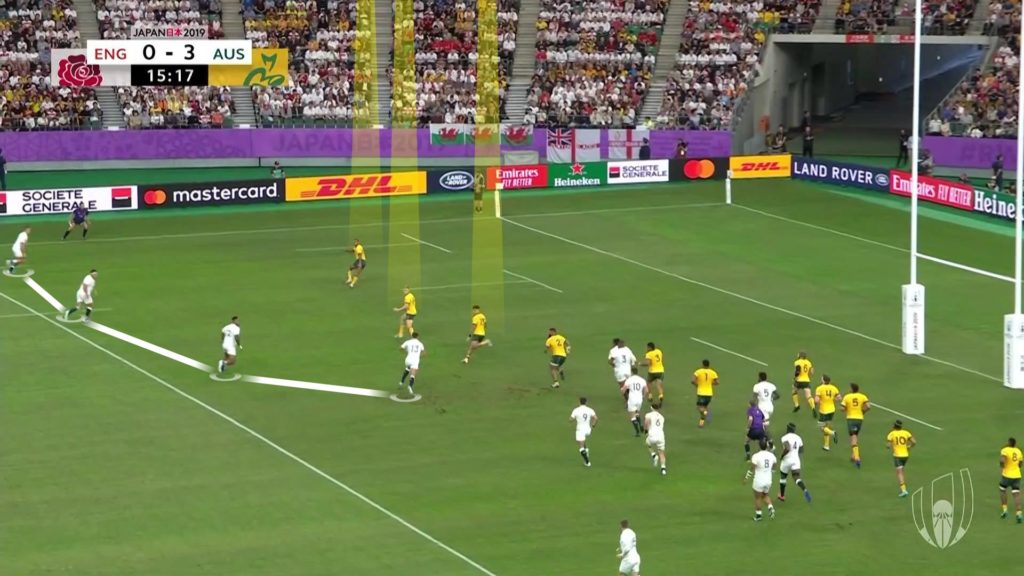
Also, you may have noted how Farrell slides around behind. But he doesn’t become first receiver, instead allowing Slade to step in for the next phase at first receiver, setting England up to exploit this close defensive edge.
Slade carries to the line with Underhill as the short ball option. Slade fixes Lealiifano and Pocock whilst Petaia takes Underhill.
As a result England have again eaten up another two defenders and kept the ball alive and as Farrell slides around with May tracking him and taking the pass from Slade he’s able to attack Koroibetes channel leaving Daly and Watson free to attack Beale (the closest defender).
Essentially in one phase England have manufactured a 2 vs 1 on this close side.
Beale does really well here reading the play and rushes in to try and pressure Daly, who shows nice soft hands to get the ball away and it’s a testament to how hard the Australians work that they fold under and manage to shut Watson down.
As England recycle again we can see them adopt their familiar 1-3-3-1 formation.
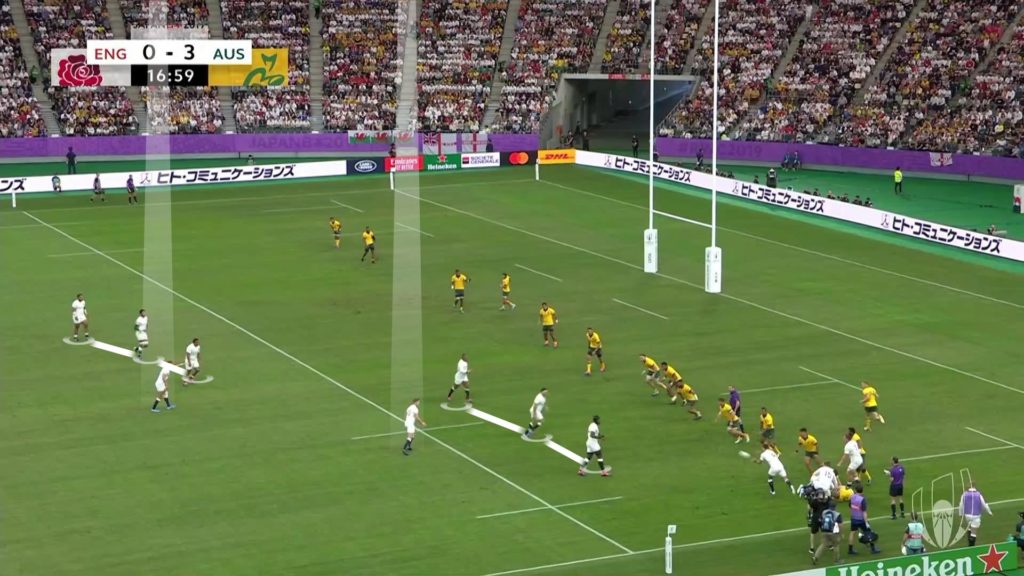
Counting the pitch they have Underhill in the close ruck. The first unit is Itoje, George and Sinkler, with both Vunipolas and Lawes making up the second unit and Curry loitering out in the far 15m channel out of shot.
With three forwards as the body, Farrell and Slade act as the pod’s tails (or brains) respectively.
Young’s plays in behind to Farrell who has a wide option or a behind option to Slade.
He opts to keep momentum moving forward and finds Mako Vunipola on a short ball. Lawes tracks in to secure the ball and Billy Vunipola stays alive and floats out to set up the next carry unit with Tuilagi and Slade.
England’s pods are adapting. Evolving in reaction to what unfolds in front of them.
Young’s misses George who’s wrapped around and Tuilagi takes a flat pass from Farrell again smashing the ball up and over the gain line. Billy Vunipola, George and Slade clearing the ruck.
Before Tuilagi takes contact we can see exactly how much space this simple 4 phase sequence has generated, and how Hodge is pretty much all on his own.
England’s sheer brute force in getting over the gain line has made the Australian defence bend in and around. The speed of the ruck has made it difficult for them to re-align and it’s only a matter of time until England exploit the space and numbers imbalance they’ve generated.
Again, England generate quick ball and are left with a 3 vs 1.
All they need to do is run straight suck in Hodge and the job is finished.
It’s a good try for England, off the back of weathering a lot of Australian pressure and conceding points they use a combination of brutality and skills under pressure.
In some ways it’s quite startling that such simple play can break down an elite level defence with such ease, but if they can repeat this level of control against the All Blacks remains to be seen but we’re seeing an England side that can attack and, importantly, manipulate a defence into the areas they want. It’s about as good a chance as they’ll ever have.
Author: The Dead Ball Area